Web Module - Serve Webpage
We have completed the boilerplate for the Wi-Fi connection. Next, we will use the picoserve crate to set up a route for the root URL (“/”) that will serve our HTML page.
impl_trait_in_assoc_type feature
The picoserve crate requires the use of the impl_trait_in_assoc_type feature, which is currently an unstable feature in Rust. To enable this feature, you need to add the following line to the top of your lib.rs file(which we did already):
#![allow(unused)]
#![feature(impl_trait_in_assoc_type)]
fn main() {
}
Application and Routing
The picoserve crate provides various traits to configure routing and other features needed for a web application. The AppBuilder trait is used to create a static router without state, while the AppWithStateBuilder trait allows for a static router with application state. Since our application only serves a single HTML page and doesn’t require state, we will implement the AppBuilder trait. You can find more examples of how to use picoserve here.
#![allow(unused)]
fn main() {
pub struct Application;

impl AppBuilder for Application {
    type PathRouter = impl routing::PathRouter;

    fn build_app(self) -> picoserve::Router<Self::PathRouter> {
        picoserve::Router::new().route(
            "/",
            routing::get_service(File::html(include_str!("index.html"))),
        )
    }
}
}
We have created a simple struct that implements the AppBuilder trait. We need to specify the PathRouter type, and we define it as any type that implements the routing::PathRouter trait.
Then, we need to implement the build_app function, which returns a Router instance. We set up a single route for “/,” which serves a static HTML page. The content of the HTML page is embedded into the application at compile time using the include_str!(“index.html”) macro. Place the “index.html” file in the “src/” folder.
Pool size
We need to start multiple tasks to handle incoming requests. Soon, we’ll create a web_task function(an Embassy task) with a pool size set by a constant value we define now. Then, we’ll launch tasks in a loop based on this value, which controls how many tasks can run concurrently.
#![allow(unused)]
fn main() {
pub const WEB_TASK_POOL_SIZE: usize = 2;
}
We have set the pool size to 2. In the picoserve’s examples, the pool size is set to 8. You can increase the pool size, but keep in mind that you’ll also need to adjust resources like sockets and memory arena accordingly.
Web Application
We will define a WebApp struct that contains an instance of the picoserve router and the configuration.
#![allow(unused)]
fn main() {
pub struct WebApp {
    pub router: &'static Router<<Application as AppBuilder>::PathRouter>,
    pub config: &'static picoserve::Config<Duration>,
}
}
Next, we implement the Default trait for WebApp and initialize the picoserve Router by calling build_app. We also configure server timeouts to control the duration for operations like reading a request, waiting to read, or waiting to write a response. If any operation exceeds the timeout, the connection will be closed.
#![allow(unused)]
fn main() {
impl Default for WebApp {
    fn default() -> Self {
        let router = picoserve::make_static!(AppRouter<Application>, Application.build_app());

        let config = picoserve::make_static!(
            picoserve::Config<Duration>,
            picoserve::Config::new(picoserve::Timeouts {
                start_read_request: Some(Duration::from_secs(5)),
                read_request: Some(Duration::from_secs(1)),
                write: Some(Duration::from_secs(1)),
                persistent_start_read_request: Some(Duration::from_secs(1)),
            })
            .keep_connection_alive()
        );

        Self { router, config }
    }
}
}
Web Task function
We have created an Embassy task and specified the pool size in the attribute. The web server will listen on port 80. For each task, we define the TCP read and write buffers, along with the HTTP buffer. Finally, we call the listen_and_serve function from picoserve to handle incoming requests.
#![allow(unused)]
fn main() {
#[embassy_executor::task(pool_size = WEB_TASK_POOL_SIZE)]
pub async fn web_task(
    task_id: usize,
    stack: Stack<'static>,
    router: &'static AppRouter<Application>,
    config: &'static picoserve::Config<Duration>,
) -> ! {
    let port = 80;
    let mut tcp_rx_buffer = [0; 1024];
    let mut tcp_tx_buffer = [0; 1024];
    let mut http_buffer = [0; 2048];

    picoserve::Server::new(router, config, &mut http_buffer)
        .listen_and_serve(task_id, stack, port, &mut tcp_rx_buffer, &mut tcp_tx_buffer)
        .await
        .into_never()
}
}
Clone the existing project
You can also clone (or refer) project I created and navigate to the webserver-html folder.
git clone https://github.com/ImplFerris/esp32-projects
cd esp32-projects/webserver-html
How to run?
For this example also, we need to pass the environment variables for the Wi-Fi connection. You can either create a .env file or pass them directly, as I am doing here.
SSID=YOUR_WIFI_NAME PASSWORD=YOUR_WIFI_PASSWORD cargo run --release
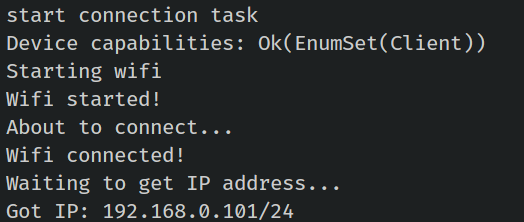
Once you flash the program onto the ESP32, you should see the following output in your console with the IP address assigned by your Wi-Fi router.

Make sure your system is connected to the same Wi-Fi network. You can then access the webpage by navigating to “http://192.168.0.101/” (replace with the IP address you received) in your browser.
