Let the fun begin
In the main function, we will perform the usual setup steps like initializing the Wi-Fi stack, SPI device, and creating an instance of the Dashboard we defined earlier.
#[esp_rtos::main]
async fn main(spawner: Spawner) -> ! {
    // generator version: 1.0.0

    let config = esp_hal::Config::default().with_cpu_clock(CpuClock::max());
    let peripherals = esp_hal::init(config);

    esp_alloc::heap_allocator!(#[unsafe(link_section = ".dram2_uninit")] size: 98767);

    let timg0 = TimerGroup::new(peripherals.TIMG0);
    esp_rtos::start(timg0.timer0);

    info!("Embassy initialized!");

    let radio_init = &*lib::mk_static!(
        esp_radio::Controller<'static>,
        esp_radio::init().expect("Failed to initialize Wi-Fi/BLE controller")
    );
    let rng = Rng::new();

    let stack = lib::wifi::start_wifi(radio_init, peripherals.WIFI, rng, &spawner).await;

    let spi_bus = Spi::new(
        peripherals.SPI2,
        spi::master::Config::default()
            .with_frequency(Rate::from_mhz(4))
            .with_mode(spi::Mode::_0),
    )
    .unwrap()
    //CLK
    .with_sck(peripherals.GPIO18)
    //DIN
    .with_mosi(peripherals.GPIO23);

    let cs = Output::new(peripherals.GPIO33, Level::Low, OutputConfig::default());
    let mut spi_dev = ExclusiveDevice::new(spi_bus, cs, Delay).unwrap();

    // Initialize Display
    let busy_in = Input::new(
        peripherals.GPIO22,
        InputConfig::default().with_pull(Pull::None),
    );
    let dc = Output::new(peripherals.GPIO17, Level::Low, OutputConfig::default());
    let reset = Output::new(peripherals.GPIO16, Level::Low, OutputConfig::default());
    let epd = Epd1in54::new(&mut spi_dev, busy_in, dc, reset, &mut Delay, None).unwrap();

    let tls_seed = rng.random() as u64 | ((rng.random() as u64) << 32);

    let mut app = Dashboard::new(stack, epd, spi_dev);
    app.start(tls_seed).await;

    loop {
        Timer::after(Duration::from_secs(1)).await;
    }
}
Clone the existing project
You can also clone (or refer) project I created and navigate to the wifi-webfetch folder.
git clone https://github.com/ImplFerris/esp32-epaper-weather/
cd esp32-epaper-weather
How to run?
We will need to pass the Wi-Fi name (SSID), Wi-Fi password, and Open Weather API key as environment variables when flashing the program onto the ESP32.
SSID=YOUR_WIFI_NAME PASSWORD=YOUR_WIFI_PASSWORD API_KEY=OPEN_WEATHER_KEY cargo run --release
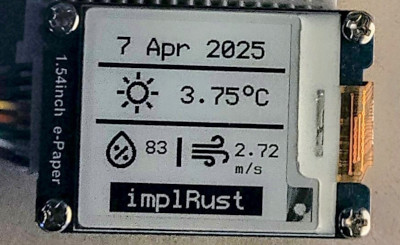
If everything goes successfully, the e-paper display will flicker briefly to clear and render the content, and you should see the weather data displayed.